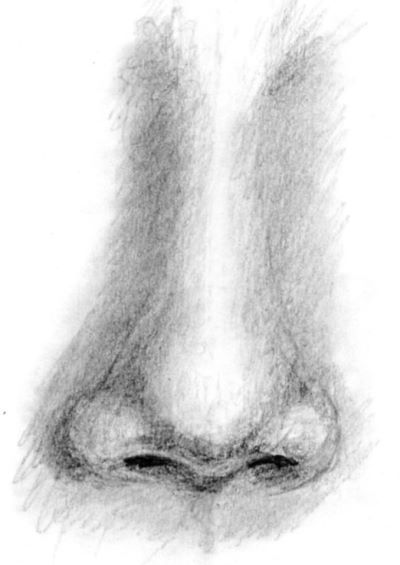
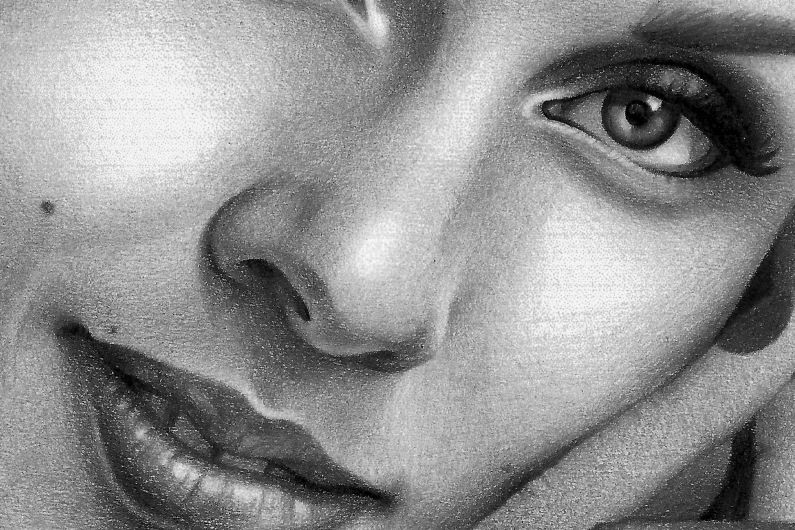
Noses are noseworthy – the nose is the only part of ourselves constantly in view when we open our eyes. (Our brain adapts, so unless we concentrate we don’t consciously see it). There’s an almost infinite variety of noses and they are arguably the most noticeable part of the face as they are not only on your face but in your face too.
Drawing a nose is not that easy because the shape is largely defined by shading. There are a few hard or found edges such as in the in the nostrils but for the most part the shape of the nose depends on subtle variations in value – so you need to use your eyes to draw your nose.
But – all noses follow the same basic pattern and have the same bits (although there are endless variations on a theme). Once you know what the “bits” are and how they fit together, you’ll be able to draw any particular nose more accurately.
If you are using a reference, turn it upside down. Its easier to see shadows this way without interference from the brain.
Anatomy of the Nose
The default shape we are hardwired to use for eyes is an oval, with the widest part of the opening in the middle.
To make your drawing uber-realistic, draw the highest point of the top lid roughly 1/3 in from the inner corner of the eye and the widest point of the lower lid roughly 1/3 in from the outer corner.
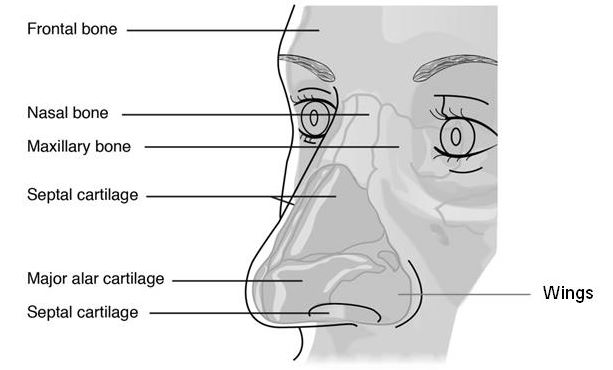
The nose is made up of three parts:
- the bony part, which is attached to the skull
- the cartilage which is the biggest part and protrudes forward from the face
- the fatty “wings” making up the nostrils which encircle the openings to the nasal cavities.
Each side of the nose is the mirror image of the other.
The bony part can be easily felt on your own face. Notice that there is a very slight ridge where the nasal bone joins the septal cartilage). Though small, this can affect the shading and the final shape of the nose as the nose often widens slightly at this point.
The cartilage makes up the fleshy bottom part or “ball” of the nose and the long straight bit we know as the bridge of the nose. The ball is made up of two bits of cartilage; (the alar cartilage although you only need remember the names to impress your friends). In most people it looks like one solid piece because the join is usually not visible from the outside. In some noses it is. This alar cartilage or “ball,” curves downwards and inwards to meet the skull at the base of the nose.
The nostrils, which are made of fatty tissue, are attached to the sides of the (septal) cartilage at the top and they also curve down to meet the bones of the skull under the nose. Note that the nostrils join the skull further back than the ball of the nose does. This is because the skull is not flat but curved.
The ball of the nose and the wings of the nostrils don’t join up with each other at the bottom edge of the nose – this is a common mistake when drawing noses. Both the ball and the nostril wings have thickness which must be shown for the nose to look real.

If you are drawing from a colour photograph, always print out a grayscale version which makes it much easier to judge the relative values of the parts you are drawing.
The Planes of the Nose
The nose is made up of many planes (or surfaces) which have different shapes and will therefore catch the light differently. Because the change between these planes in the normal nose is quite slight they can be difficult to spot. To find the largest areas or planes, it is easier to simplify the nose to a box-like shape which has easy-to-spot edges i.e. a top surface (plane), two side planes and a two bottom planes joined in the centre like this:
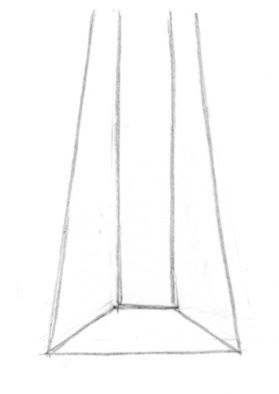
Add a light source and the major planes of the nose become more obvious. Each plane will have its own value, depending on how far it is from the light. . (Remember the Golden Rule – the further from the light an object is, the darker it gets)
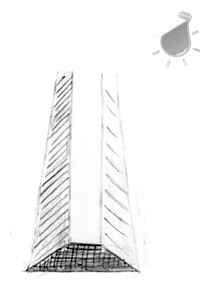
Of course our noses aren’t conveniently box shaped. There are many smaller shapes or planes within the major planes shown above.
An easy “crutch” to use when drawing these smaller planes of the nose is as follows:
Sketching the Nose
An easy “crutch” to use when drawing these smaller planes of the nose is as follows:
Draw a line with a circle at the end for the ball of the nose. Divide the circle into thirds vertically and then draw another line (all very lightly), one third up from the bottom as per the diagram below.
Next add two smaller circles on either side for the nostril wings.
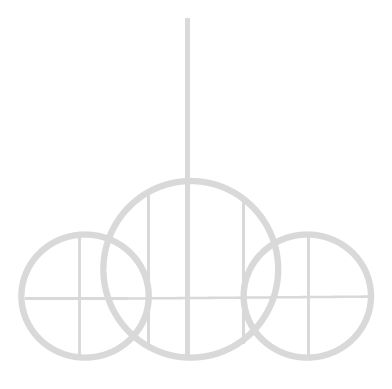
Draw two slightly curved lines to represent the bridge of the nose. They will be closest together between the eyes and gradually widen to where they join to the bulb of the nose.
Draw very light guidelines and as you go, erase those guidelines that are no longer necessary.
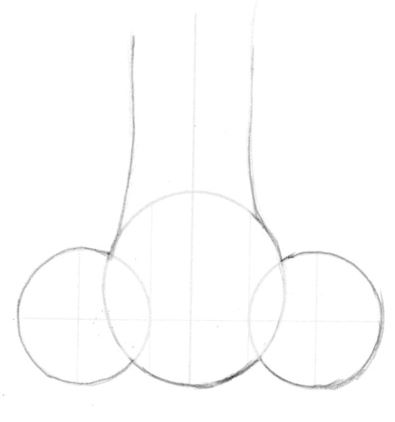
Now modify your drawing slightly to get a more realistic looking shape.
Be very careful to show the width of the wings of the nostrils. They join onto the skull but not to the septum of the ball of the nose.
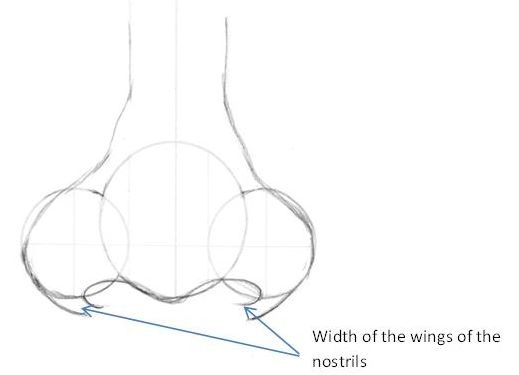
All your guidelines should be drawn very lightly using a soft pencil which is easier to erase. (e.g. HB or 2B)
Shading the Nose
Next we need to shade each of the smaller planes of the nose which from part of the major planes we identified in our “boxed” nose.
If you are drawing an imaginary nose, you get to decide which side the light is coming from. If, for example it is coming from the top right, the entire left side of the nose will be very slightly darker in it’s overall value than the right hand side.
There are lots of different planes in each half of the nose, caused by the anatomy of the nose which will have value changes, but all the planes on the side further from the light will be ever so slightly darker.
If of course you choose to have your nose lit from the front, there will be no difference in the two sides, but your drawing will be very flat as a result so I always recommend that you have the light coming from the side when drawing portraits.
If you are using a reference photo, you will have to look at the shadows very carefully to decide the direction of the light.
Caress your paper when shading, don’t abuse it. Once you have squashed the tooth of the paper you have reached the point of no return – it’s very difficult to go either darker or lighter.
Patience is essential when drawing – build up your drawing in layers gradually until the correct tonal value has been reached.
Easy does it when shading. Rather start light (2H or even 4H). You can always go darker but it’s not so easy to lighten an area that you have over-darkened.
Shading the bridge of the nose
The top plane, (the bridge of the nose) will be the best lit because it juts out and catches the light. (The brightest highlight usually is found in this light area). Because even the plane of the bridge is not totally flat, there will be subtle differences in value across this area.
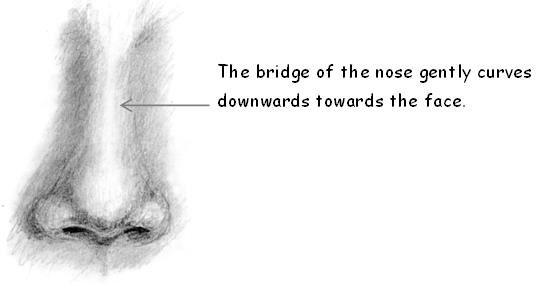
The sides of the nose, as they drop sharply away from bridge, will increase in value, (get darker). They gradually flatten out as they join the face and decrease in value, (become lighter), as they move more into the light again.
If drawing very smooth skin, like that of a baby, use a chamois leather to do your final blending. You can cut your chamois into small pieces which are easier to manipulate. Fold the chamois into a point to get into small areas.
Shading the ball of the nose and the nostrils
Both the ball of the nose and the nostrils are rounded in shape, so shading these parts will follow the rules for shading a sphere.

The ball of the nose also has distinct planes, but they are often well disguised so you need to know what to look for. Whether the nose looks wide and bulbous, or thin and sharp, will depend on the shape of the centre plane of the nose vs the side planes. It is only by carefully observing these planes that you will spot these defining values.

There is often a highlight on the top of the ball of the nose. Be careful however not to make this too light or it will look unnatural – like a snowflake has landed on the nose.
Likewise, in the wings of the nostrils, the top planes will be brighter than the bottom planes which curve down and away from the light.
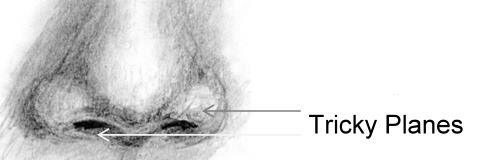
The tricky little planes between the ball of the nose and the nostril wings are very subtle but very important to defining the shape of the nose. Observe them carefully and copy the shape of the shadows here exactly to get this area correct.
If your light source if bright enough, there will be a cast shadow underneath the nostrils visible.

Don’t forget to look out for the light reflected up from the surroundings onto the downward curving parts of the ball and nostrils. Though hardly noticeable, reflected light is important to convey the roundness of the nose. Remember, reflected light is part of the shadow group in your drawing and must therefore be darker than the darkest light value of your lights.
Nostril openings should not be just black holes. (That Cardinal Rule applies again.) Nostrils are at their darkest where the nasal cavity emerges from the skull but from there they get lighter as more light gets in. By having a graduated (from dark to light), shading here you achieve the “looking in effect” which gives depth to your drawing.
Good luck in drawing your nose and just remember – a nose by any other name is just as sweet and practice makes perfect.
Here is my completed nose drawing:
