
Tooth be told, teeth are not easy to draw well.
They are very individualistic and often differ in shape from their counterparts; e.g. two incisors or two canine teeth in the same jaw may look very different from each other.
This means that careful observation, (if you are drawing from a reference), is essential. If you are drawing teeth from your imagination then introduce some imperfections so they don’t end up looking too perfect.
Types of Teeth – Introducing the Players
There are two identical sets of teeth in the mouth - one in the top jaw and one in the bottom. Each set is made up of 5 different types of teeth, not including the wisdom teeth, (which not everybody has).
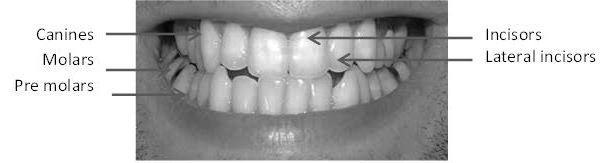
There are two incisors in the front, which are found on, or close to, the midline of the mouth. They are usually (but not always) the widest teeth.
Next to them are the two slightly narrower lateral incisors, one on each side, followed by the canines. The two canine teeth often tend to be slightly more pointed than their neighbours. They are usually about the same width as their neighbours, the lateral incisors, but not always.
The premolars come next - two on each side of the mouth. They are wider, but because they are further back in the mouth, and because of perspective, (more about that later), they appear narrower and are often partly concealed by the lips. The same applies to the molars, two on each side which complete the set of teeth.
How to Draw the Open Mouth
Important! - Always keep the guidelines very light. Use your 2H pencil very lightly or even better use a pointed blending stick which has graphite on it as a drawing tool.
Draw a shape roughly like a very symmetrical banana – about 3 - 5 times as long as it is wide. This will be the part of the mouth between the top and bottom lip. How much of the top and bottom teeth you want to show, will be determined by how wide you make the mouth opening. (If you are drawing from a reference this will be decided for you).
Draw a curved line in each corner of the mouth to show the cheeks inside the mouth.
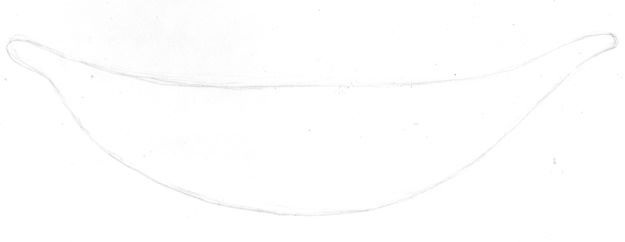
Divide this banana shape with a curved line roughly in half. This line will be the guideline for the bottom of the top teeth.
Divide the bottom section again about 1/3 up from the bottom with another line; (this will be the guideline for the top of the bottom teeth.
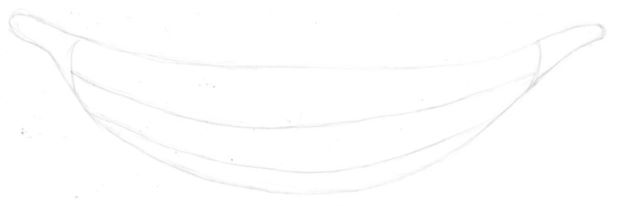
(If you only want to show the top teeth then you can make your banana shape narrower and not divide it at all. The top teeth would then be overlapped by / overlap the bottom lip.)
Divide your drawing in half at the midline with a lightly drawn vertical line.
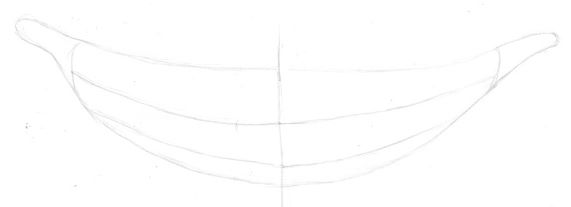
Now draw in the guidelines for the teeth.
Start with the two incisors - one on each side of the midline. Draw two lines parallel to the midline the width you want the incisors to be. Then measure the width for the lateral incisors which should about the same or very slightly narrower. (Once again teeth tend to ignore “shoulds” and do their own thing).
Next draw in the canine followed by the two premolars and molars. The molars and premolars are larger but because of perspective of the mouth, they are often partially hidden behind the other teeth and/or covered by the lips.
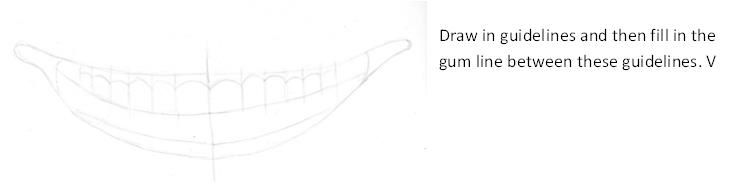
Now you have your lines drawn, start drawing in the gums. Use a very light touch and a 2H pencil. If you are drawing from a reference, take careful note of how much gum shows above the top teeth. Some mouths have no gum showing at all because they are covered by the upper lip.
If drawing from imagination, you get to decide how much shows.
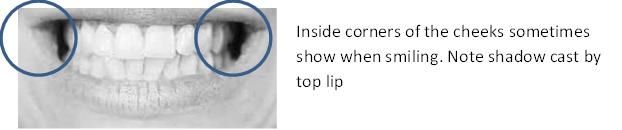
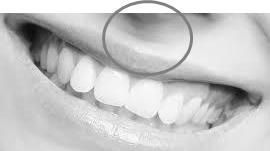
The inward-sloping guideline you drew inside the open mouth area represents the sides of cheeks inside the mouth which are visible when the lips pull back and apart while smiling. (This is not always the case so when drawing from a reference observe carefully). Notice how the values change along this line because of the shadow cast by the upper lip.
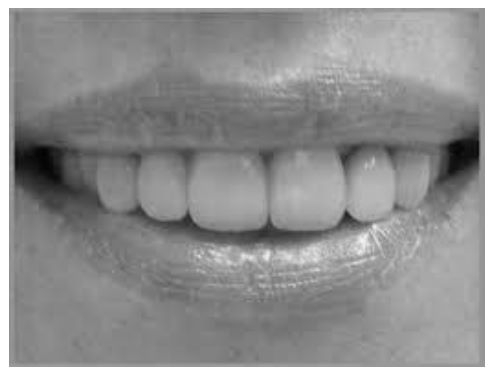
The number of teeth you can actually see in the smiling mouth depends on the particular mouth being drawn. Usually however, the incisors, lateral incisors and canines are visible. Thereafter the number of teeth you can see depends on the curve of the jaw and the width of the smile.

Perspective in Teeth
As discussed in a previous tutorial, (How to draw the mouth), the tooth cylinder is curved around the skull not flat. Therefore when looking head on, the front teeth (incisors) will be closest to the viewer. The rest of the teeth will very slightly curve around the tooth cylinder towards the sides of the mouth and in doing so become partly hidden from view. This most often is the case with the molars and premolars.
Not all tooth cylinders follow the same curve. Some may be sharper and others flatter, which influences how the teeth look in the mouth.
Drawing in the Top Teeth
Very lightly outline the teeth. If you are not copying a reference, remember to make the corners of the teeth rounded - not sharp like piano keys. The edges must be mere suggestions not solid lines. Dark lines between teeth will make your drawing look like a cartoon.
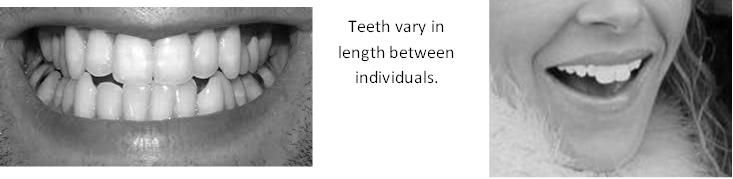
Notice that the teeth may not all be the same length. Some people have long front teeth, others long back teeth and still others long canine teeth. Use your imagination. (If using a reference observe closely).
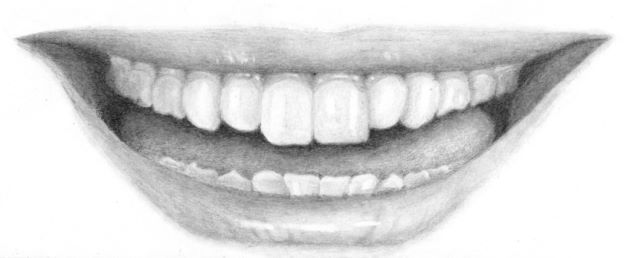
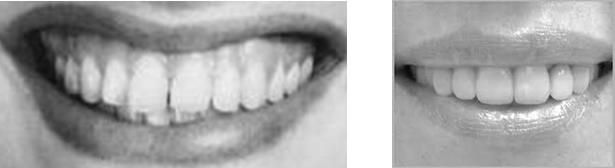
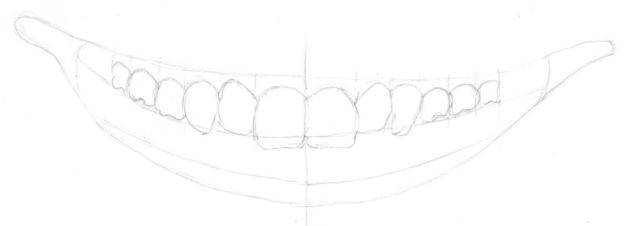
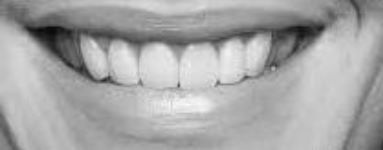
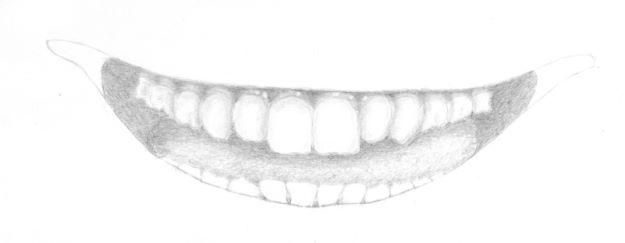
Your drawing should look something like this:
Drawing the Bottom Teeth
The bottom teeth are generally smaller than the top teeth because the bottom jaw is smaller than the top jaw. The same types of teeth are found in the bottom jaw; and in the same locations.
The easiest place to start drawing the guidelines for the bottom teeth is again at the centreline. Often however, the bottom incisors don’t conveniently line up with the midline of the upper jaw incisors. (This may seem a small difference; but it’s one that makes a big difference to the realism of your drawing).
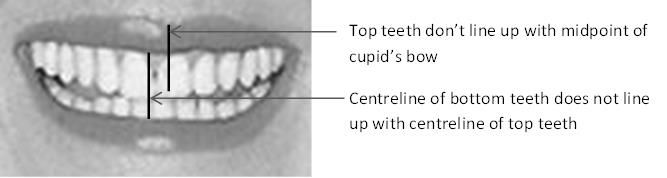
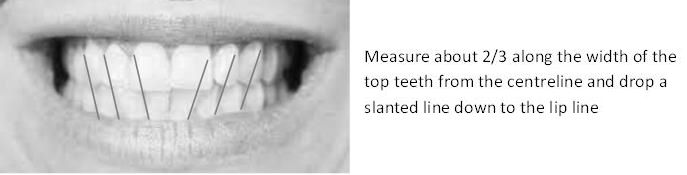
To judge where the guidelines for the bottom teeth should be, use the top teeth as a guide. Start your guideline at about 2/3 the width of the top tooth and slope it down gently to where it meets the bottom lip line. Drawing these guidelines is not an exact science nor is the positioning of teeth. They are merely there to assist so don’t stress.
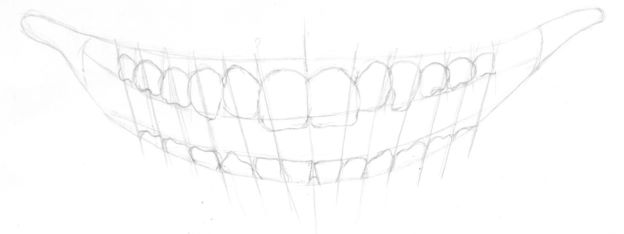
Draw the bottom teeth using the guidelines as an aid.
Shading the Teeth & Gums
When you shade, start very light and work in layers.
Press very lightly with your pencil. Often just the weight of the pencil is enough.
It’s always easier to go darker then to lighten a too-dark area.
Adjust the values of areas as you go along. Values are relative to each other; i.e. it is more the contrast, (difference between), the values that is important rather than each value alone.
Preserve the tooth of your paper at all costs. Don’t press hard with your pencil which will flatten the tooth of the paper and it won’t be able to accept more graphite if you want to go darker. Also you won’t be able to remove graphite with your putty eraser as easily when you want to go lighter.
When drawing fine detail, use a heavy grade paper (180gsm+) which can take a lot of layers and can withstand erasing better than a thinner paper.
A paper with a smooth surface will give you better results than a rough texture paper when detail is important.
Shading the Gums
Remember:
The gums are almost always darker in value than the teeth.
They are not all the same value. The gums cover the teeth and because each tooth has a roundish shape they cause a slight bulge in the gums. This bulge will be slightly lighter than the surrounding gum because it projects forward and catches more light. This effect will lessen towards the corners of the mouth where there is less light.
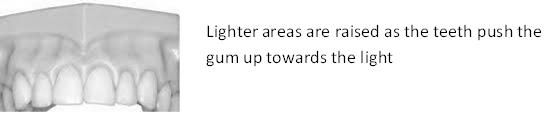
The gum line directly under the top lip will be slightly darker because of the shadow cast by the top lip.
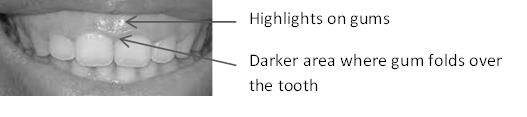
Because the gums are normally wet, there will be small bright, hard-edged highlights here and there on the gums as the light reflects off the wet surface.
Shade the gum area very lightly all over with your 2H pencil. The edge between the gums and the teeth will be a hard edge; (clean edge between two values).This edge will be very slightly darker immediately above the tooth the gums above the teeth because the gum curves round to meet the tooth and in so doing moves away from the light.
Now either look at your reference, or decide on the different values in the gums. The edges between the lighter and darker areas are soft edges, (gradual change between values); so there should be no harsh lines, only gentle graduations from light to dark. Use a slightly softer pencil (HB) always with a light pressure to achieve this.
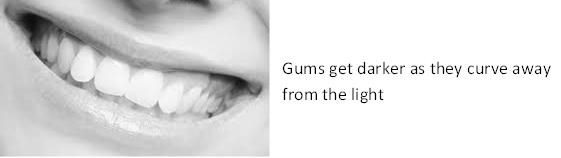
As the teeth curve towards the corners of the mouth they move away from the light and the gums will become overall darker than the gums in the centre of the mouth. These differences are very subtle but are what makes for a realistic drawing.
Besides this slight darkening towards the corners, the gums on one side of the mouth, (the one closest to the light source), will be overall slightly lighter in value than on the side of the mouth which is further from the light source. You can lightly shade over the entire area with an H or HB pencil – once again with very light pressure to achieve this overall darker area.
Instead of shading with a pencil, use powdered graphite and a soft paintbrush to slightly darken larger areas of your drawing. if you don't have powdered graphite make your own by rubbing an HB pencil against fine sandpaper. Dip your paintbrush in the powder and shake off the excess before applying to your paper.
Drawing Highlights on the Gums
To draw the very small highlights on the gums it’s easier to first finish you’re shading and blending of the gums and then shape a putty/kneadable eraser into a very fine point – like an insect’s antenna - and delicately pick out the highlights. Don’t overdo.
What helps to make the highlights really “pop” is to use the tip of a sharp blending stick which is covered in graphite to gently darken around the highlights you just made. You could also use a pencil - but very lightly, otherwise it may look as if your teeth have measles!
Shading the Teeth
Remember:
Teeth are not white but shades of grey.
Teeth usually have white highlights which help describe their form.
There are no harsh lines between teeth - only shadows. The effects of perspective and light direction apply to the teeth as well i.e., teeth towards the edges of the mouth are darker. (Golden Rule – the further from the light the darker it gets).
The top of the teeth, which lies under the shadow of the upper lip is darker.
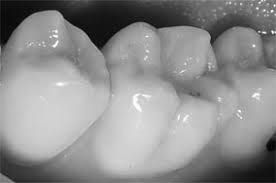
Teeth are usually not flat. Instead they have rounded forms and even undulating forms as in the molars. The way to indicate this form is with very subtle shading. The edges of the teeth will be ever so slightly darker in value than the centre. And indent in the tooth’s surface will be shown by a soft shadow. (No hard edges).
The bottom edges of the teeth are sharp/clean edges because they separate the teeth from mouth cavity behind.
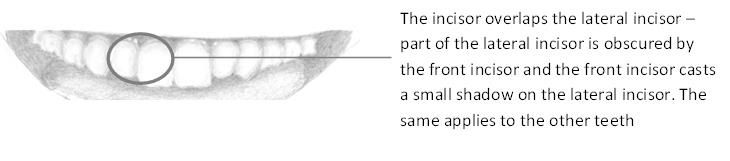
Except for the incisors, teeth overlap each other very slightly. This can be shown by shading and line.
There are also highlights on the teeth that can be pulled out using a kneaded/ putty eraser. Their shape is usually longer than the highlights on the gum because of the shape of the teeth. Again darken around the edges of the highlight to get that extra “pop”.

Shading the Mouth Cavity & Tongue
Behind the teeth lies the mouth cavity. Little light gets in, so the shadow will be very dark.
Adjust your guidelines at the corners of the mouth to indicate the two lips meeting at the sides.
The mouth cavity contains the tongue which protrudes and is closer to the light and thus lighter in value than the surrounding cavity. Look carefully for where the tongue begins and shade accordingly. (It will be lighter than the mouth cavity but darker than the teeth).
When shading the tongue use small, random, circular overlapping strokes which imitate the actual texture of the tongue. Build up in layers. Lightly does it once again.
The tongue is also rounded not flat so shade the tongue to show this.

Drawing the Lips
Drawing open, smiling lips has some differences from closed lips which we describe in detail in the tutorial on How to draw the mouth.
As the lips, especially the top lip is pulled sideways by the muscles surrounding the mouth to form a smile, the lip is stretched and the Cupid’s bow in the top lip becomes shallower. Often a shadow appears behind the bow as the latter is pulled slightly forward and upwards towards the light.
The form lines which run from the centre of the lips towards the top and bottom edges also flatten out and may even run horizontally in places especially on the top lip.
These changes are less marked in the lower lip however because it is usually not as stretched as the top lip.
As the lips are also often moist, there are often highlights visible.
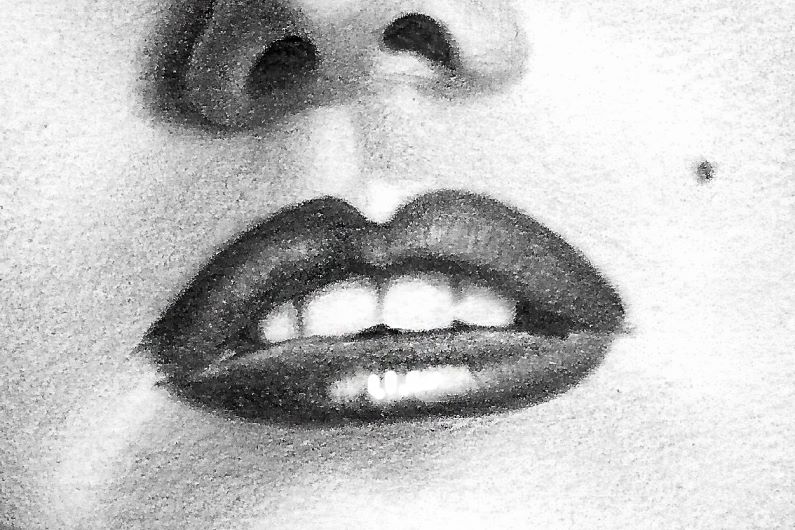
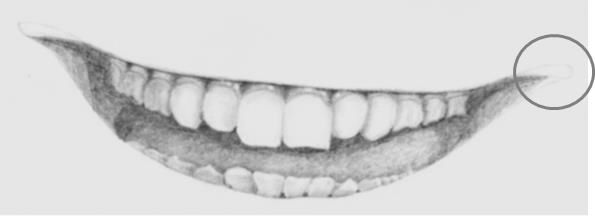
Your drawing should now be looking something like this: