
The mouth, even more than the eyes, conveys not only our opinions but also our emotions for the world to see.
As with noses, eyes and ears, there is tremendous individual variation on a standard theme in mouths. If you can identify the parts of a “generic” mouth, it will make it easier to identify the same parts in a reference and to draw them accurately.
Anatomy of the Mouth & Lips
To understand how to draw the mouth realistically, it helps to know what lies under the skin.
Muscles
The area surrounding the lips and mouth has many muscles attached. This makes it possible to move our mouths in very many ways.

These muscles create forms under the skin around the mouth which will affect the contours we see.
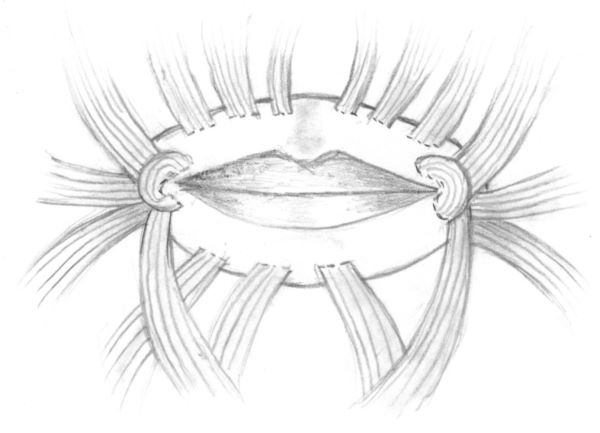
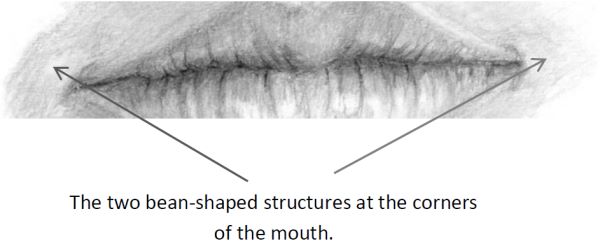
Overlapping layers of muscles result in small bean shaped bulges at the corners of the mouth.
Bone
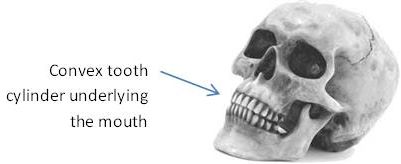
The bone of the tooth cylinder under the mouth is rounded like the edge of a can but, unlike the sides of a can, it bulges out (is convex).
When drawing on a 2-dimensional surface (the paper), different values are used to trick the eye into thinking it sees a 3-dimensional image. (i.e. one with depth.)
To show this curve of the mouth created by the underlying tooth cylinder, make the corners of the mouth subtly darker than the middle and your drawing will gain depth and not be flat.
Fatty cushions
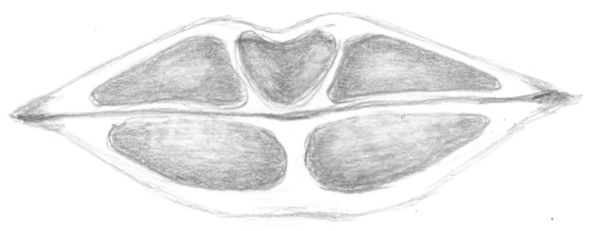
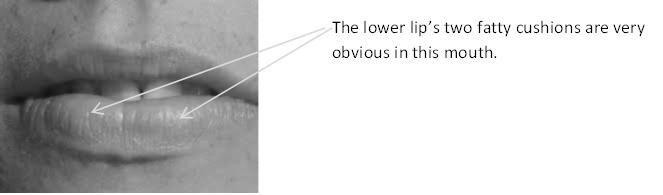
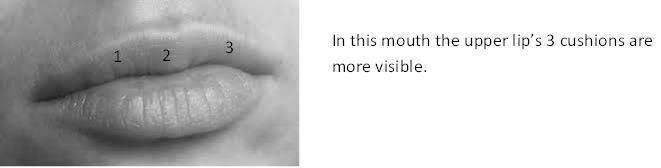
Within the lips there are 5 fatty cushions, three in the top lip and two in the bottom. They will reflect light in similar ways to a part of a sphere as they are rounded in form.
Draw what you see, not your brain's default ideal for what you are looking at. (Your brain has a built in memory of lips, etc. so it will often trick you into thinking you see something that isn't there or not see something that is there.
To bypass your brain's default image, turn your reference photo and your drawing upside down.
Drawing the Mouth
The midline
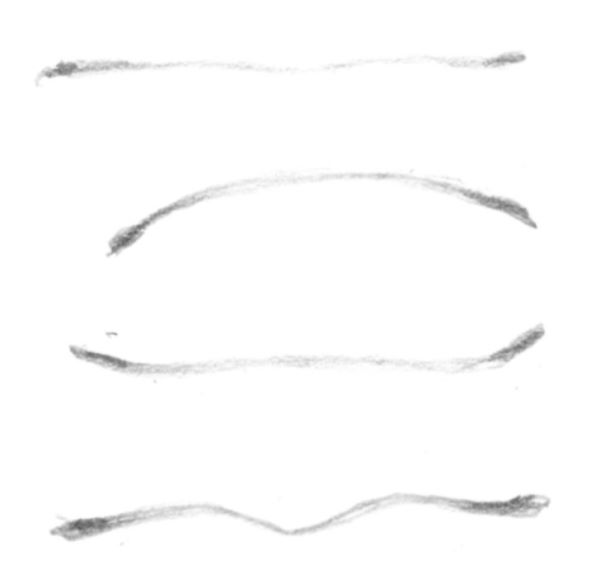
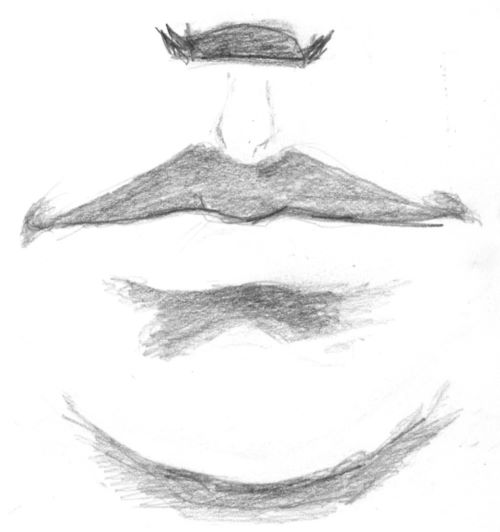
When drawing a generic mouth (or when copying a reference), it’s easier to begin with the midline.
Decide on the shape of the midline. Will it turn up or down at the corners?
If drawing from a reference, it is helpful to put a ruler or other straight object underneath the midline of the lips to better see the shape of the line.
Draw this line very lightly with a soft pencil. Note that the line gets darker at the corners.
The line is not always the same width throughout. It might be narrower or wider in places – careful observation will give you a realistic result.
The lips
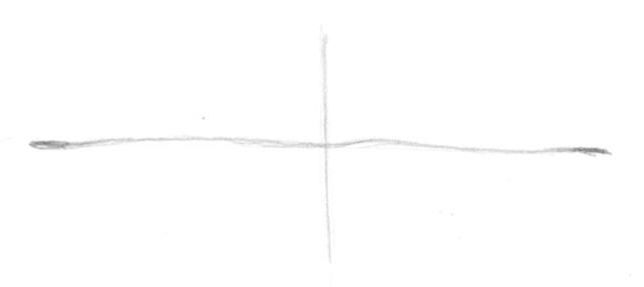
Find the centre of your line and very lightly mark it with a vertical line.
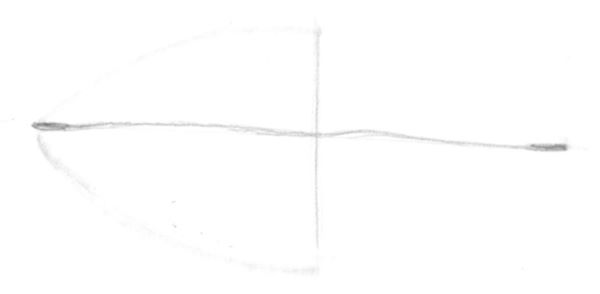
Mark the width of your lips, top and bottom, on this vertical line. Now draw an arch connecting the corner of the mouth to the midline at the places you marked. (Each half of the arch is a mirror image of the other half; so it’s easier to draw the arch to the midline and then just copy that shape from the midline to the other corner.)
It’s better not to draw the arches with a pencil, but with a used blending stick. Used, because it will still have some graphite on it which will give you very light line which will be very soft and easy to lighten (or darken) as your drawing progresses. Because the skin colour and the lip colour, especially in men, is very close in value, you don’t want to have a dark pencil line that you can’t erase - resulting in a cartoon-like outline to your lips.
(Of course if you are copying a reference of mouth with lipstick and/or lip liner applied this won’t apply)
Shaping the lips
Shape the lips more accurately within the guidelines you drew and then erase the guidelines. If drawing from a reference carefully observe the shape and width of the lips.
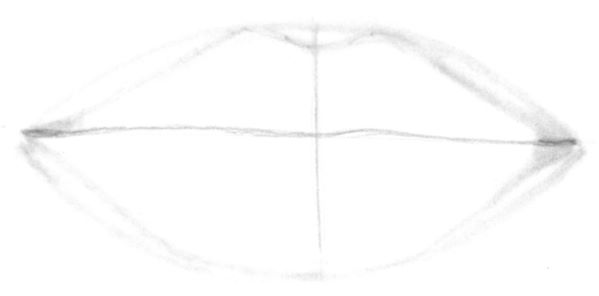
The shape of the upper lip is like twin mountain peaks. The height of these peaks and their distance from each other will vary from one individual to another.
Again, if possible, use a blending stick to draw. If you don’t own a blending stick, you can use a soft pencil (2B), very lightly. Using a hard pencil (2H or harder) will give you a light line but because there is such a high filler to lead ratio in these pencils, you can end up scratching or indenting your paper which won’t allow you to blend smoothly later.
Use a kneaded eraser to lift out highlights in shaded areas. Sometimes, especially in overall light areas, it is easier to finish blending to a smooth finish before lifting out the highlights instead of trying to shade around the highlights.
Shading the Mouth
Decide which direction your light is coming from. (If you are using a reference, this will be determined for you).
Planes of the mouth
The planes (surfaces) of the mouth will affect how they catch the light and in turn what values they have.
Main planes
One main plane which is often overlooked is the plane of the face in which the mouth sits.
The mouth is not flat but wraps around the front of the face and sits on top of the teeth. (See anatomy of the mouth above). This will have an important effect on how you shade your drawing.
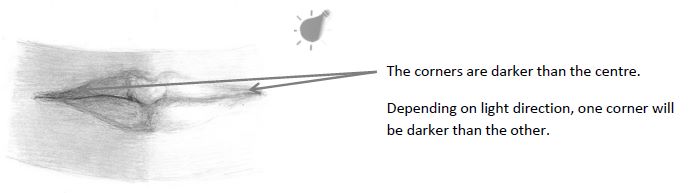
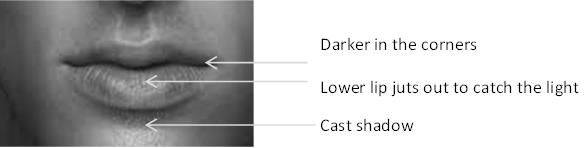
One result will be that the corners of the mouth are further from the light and are therefore darker than the centre of the mouth. Depending on where your light is coming from, one corner will be slightly darker than the other which is further from the light. (Unless you have frontal lighting, in which case both corners will be equally lit.)
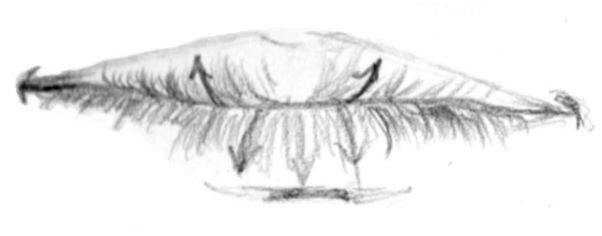
The other main planes of the lips can be broken into two downward sloping planes and two upward sloping planes.
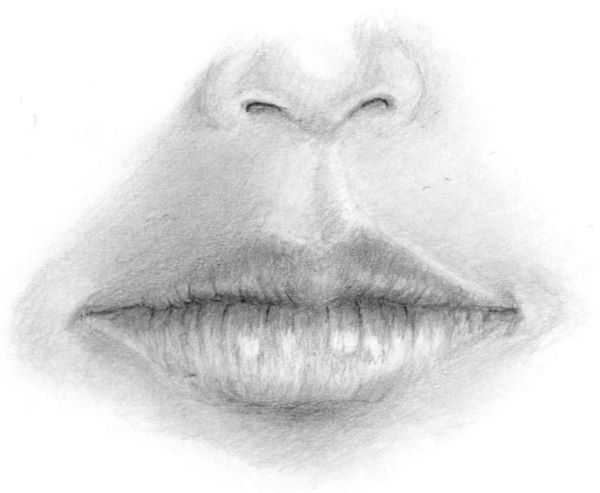
Generally, unless the lighting is from below, (as is often seen in horror movies), moving from the nose downwards towards the chin in the image above, the sequence will be shaded plane (bottom of the nose), lit plane (top surface of upper lip); shaded plane (underside of top lip); lit plane (top of bottom lip); and finally shaded plane (underside of bottom lip).
Minor planes
Within these major planes there will be minor planes caused by the fatty cushions. (See anatomy above).
How the planes affect values
There will be variations in value within a plane as well as between planes. i.e. although it lies in the same plane, the top lip will not be the same value all over, there will be subtle variations caused by the anatomy of the lip and the curve of the mouth around the head. The same applies to the bottom lip.
However, because the bottom of the top lip is a downward facing plane; the values overall will be darker than the values of the top of the bottom lip, which is an upward facing plane.
These variations are subtle but essential if you are aiming for a realistic-looking result.
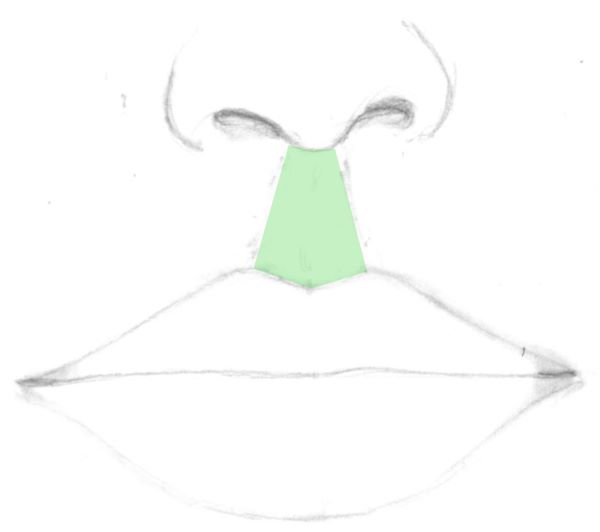
The Philtrum
Between the top lip and the nose there is a structure called the philtrum. It’s a slight indentation caused by the underlying muscles.
The philtrum is sometimes quite pronounced and in other faces, it is hardly visible.
To locate the philtrum, draw a line from the peaks of the top lip to the inside edge of where the nostrils would be. You can see it marked in green below:
Note that the shadow side of the philtrum is the side facing the light source. This is because it is concave (rounded inwards).
How deep the philtrum is can be shown by the value and location of the shadow it casts. The deeper the philtrum the darker the value of the shadow.
Study the philtrum in the drawing below to see if you can spot the inversed highlights and shadows caused by the concave shape of the philtrum.

As the philtrum shading is often very subtle, you can erase the highlights using your kneaded eraser.
The upper lip
This is usually, but not always, narrower than the bottom lip. There is a wide variation in top lip shapes from almost non-existent to very wide.
The rim of the upper lip is often lighter in value than the surrounding skin tones. This is because it is a slight ridge which catches the light.
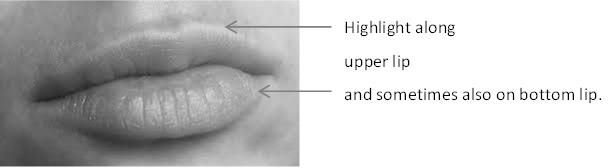
Be careful not to overemphasise this rim or it will look like a milk moustache. Be very subtle, or leave it out entirely.
Just underneath this rim on the top lip, some lips become slightly concave. Because there is a movement away from the light this area will be slightly darker. (Remember the Golden Rule – the further from the light an object is, the darker it gets)
This is very subtle; which is why, if your aim is realism, careful observation of values is key.

The contour of the top lip becomes convex as it curves out and down to join the midline of the mouth.
The upper lip is usually darker than the lower lip. This is because the plane of the upper lip lies more in the shadow.
The lower lip
The lower lip is convex and usually bigger than the upper lip so it juts out below it and will be lighter in value overall than the top lip. Often there is a cast shadow visible under the middle of the lower lip.
Similarly to the top lip, the bottom lip curves around the teeth and gets darker in the corners.
Beans ?
There is often a small bean-shaped structure visible under the skin at the corners of the mouth. (Again this is more evident in some mouths than others.)
This is as a result of the layers of muscles underlying the mouth.
Look out for this shape and be sure to shade it properly: Soft edges on the top convex side of the bean; hard edges on the lower concave side.
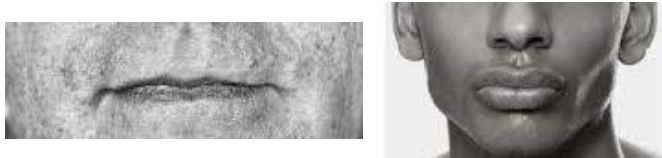
The difference between men’s and women’s lips
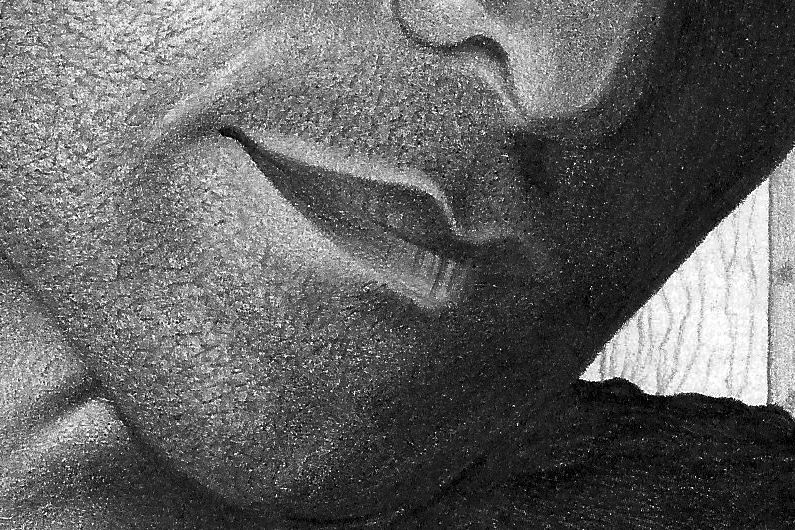
The difference between men’s and women’s lips is that men’s lips usually have more angles instead of the smooth curves of women’s lips. Men’s lips are often lighter in value than women’s lips and because of this the shadows are easier to see. Sometimes the only way to define men’s lips is by drawing the shadows without any outlines visible at all.
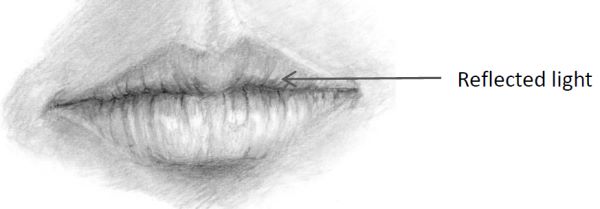
Reflected Light
Because the lower lip catches the light, it will reflect some of this light upwards onto the darker, downward sloping top lip just above the midline. Look out for this and show it in your drawing as it helps to emphasise the roundness of the lips. (Depending on the lighting conditions, this reflected light is not always visible but if you know where to look for it you won’t miss it.)
Edges of the Lips
Observe closely the differences in value between the lips and the surrounding facial skin. Especially in men, the difference between the lips and skin is so little as to be non-existent in places. If you don’t see a difference, believe your eyes and don’t draw one. The value changes around the mouth can be very subtle.
Shading Direction
When shading the lips, start at the midline which is the darkest part and move outwards. Follow the contour of the lips as you shade which will add to the impression of roundness.
Crease Lines
Lips have lines or creases which run from the midline to the top of the upper lip and to the bottom of the lower lip.

These creases help to describe the rounded form of the lips. But don’t overdo them. They don’t all stretch the entire distance to the rim of the lip. Some are only partial lines.
Observe carefully. They will be darker and thicker at the midline and gradually reduce in value and width as they move outwards to the edges of the lips. Some will be wider than others or closer and further apart – all will follow the contour of the lip.
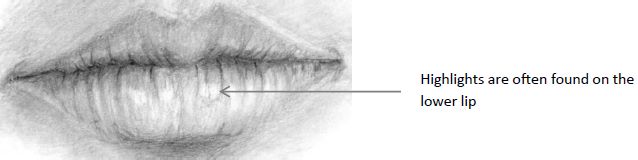
Highlights
Because the lower lip faces upwards towards the light, and because the lips are usually moist, there will often be specular (bright) highlights visible.
To make a highlight look brighter, surround it with a slightly darker value.
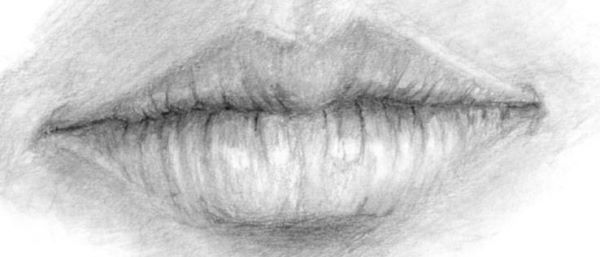
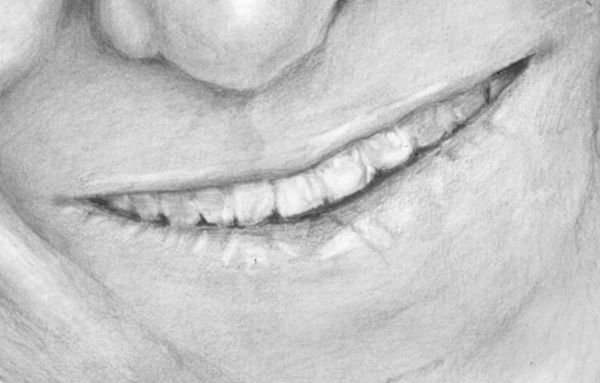
Your finished drawing of the mouth should be something like this: