
Drawing hair shouldn’t make you pull your own hair out IF you follow a logical, step-by-step approach to the task and you set aside enough time.
The trick is to work from the general to the specific:
But first these are the materials you will need:
- Good drawing paper. Not too thin in case you want to use the indenting technique. (More about this anon).
- H, HB, 2B and 4B pencils. You can get away with one medium grade pencil by varying your pressure but having more than one grade makes it easier.
- A sharpener – at times your pencil must be really sharp. (Using mechanical pencils which don’t blunt in use is an even better option but not essential).
- A kneaded/putty eraser. Alternatively you can cut an ordinary eraser to a very narrow edge.
- An empty ballpoint pen or a darning needle with the head smoothed on sandpaper - if you are going to indent.
- A cotton bud, tissue, chamois leather or other soft blending tool.
Step 1: Drawing the Contour of the Hair
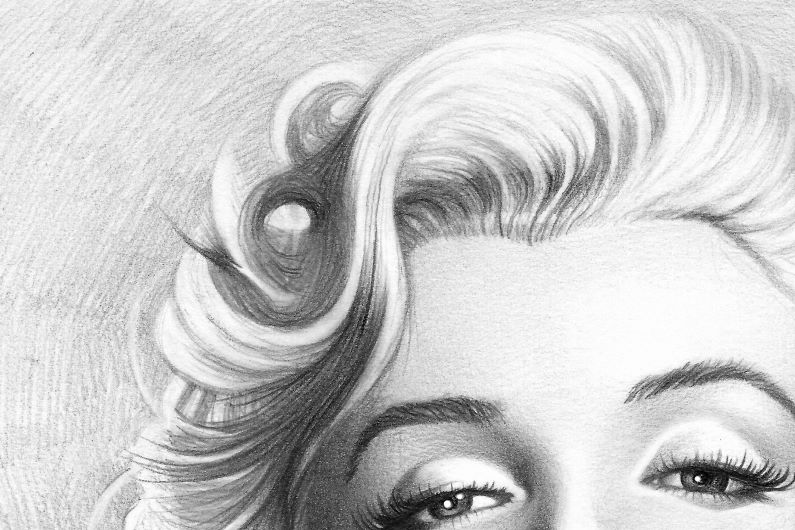
The default shape we are hardwired to use for eyes is an oval, with the widest part of the opening in the middle.
To make your drawing uber-realistic, draw the highest point of the top lid roughly 1/3 in from the inner corner of the eye and the widest point of the lower lid roughly 1/3 in from the outer corner.
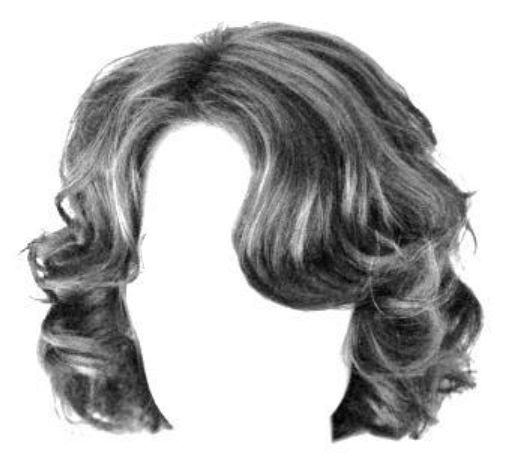
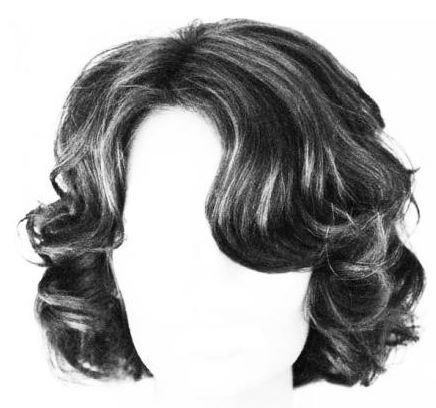
Use a reference pic as a guide when drawing hair.
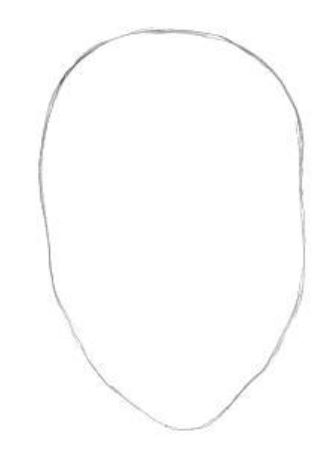
Draw an outline of the face that underlies the hair.
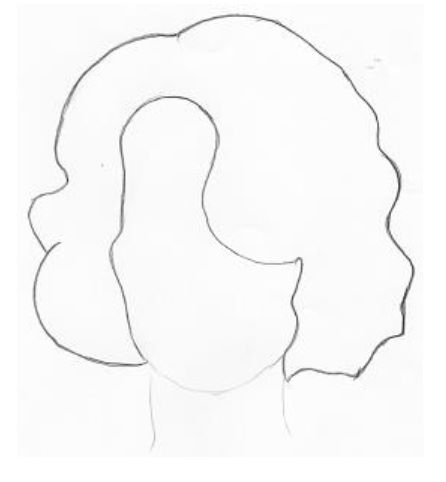
Remember there is space between the hair and the head. (Usually about 2cm but this varies). This is especially important to remember on the rounded top of the head.
If you are drawing from imagination, remember to make provision for where the hair bulges over the ears even if they aren’t visible.
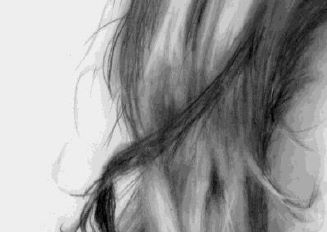
Step 2 – Go with the Flow
Now that you have drawn the hair contour or outline, take a closer look at your reference and decide in which direction the hair flows within the contour.
The flow of the hair will be different for every person and will depend on the particular hair style and the shape of the underlying head. If you squint your eyes and try to look past the detail to see how the hair curves and twists you will spot the flow.
Also don’t stress. Hair is always moving so as long as you establish general direction of movement it’s fine.
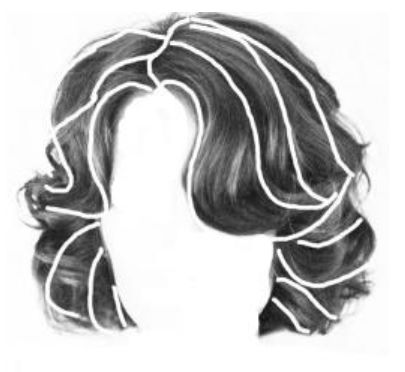
Pencil in the flow lines of the hair. In the image above you can see how I would draw in the flow lines for our model.
Step 3 - Get the Light Right.
The head is ball shaped, (roughly), and as such will cast shadows typical of a round object when a light shines on it.
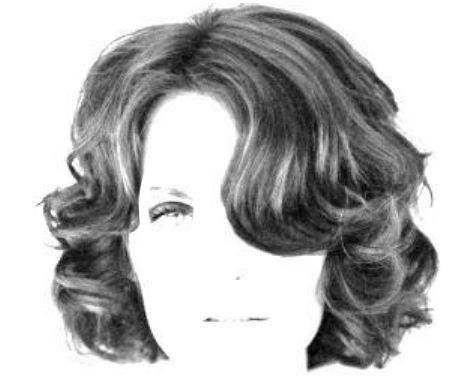
This studio pic has lighting from both sides resulting in scattered highlights and shadows.
Directional lighting results in unified shadows and highlights.
Squint to better see the different values in the hair you are drawing. There will be many variations of value on both the shadow and the light side of the head but the highlights, mid tones and shadows in the shaded areas will be darker (deeper value) overall than the highlights, mid tones and shadows on the side of the head closest to the light.
Depending on the position of the light source, the lighter parts of the hair may be on the top, on the side or scattered throughout the hair. When the hair catches light in many places, try to link these light spots so it doesn’t look as if you are drawing a Dalmatian. The same would apply to the shadows – try to link them as part of good composition.
Keep your reference showing lights and darks handy, you will need it when you start shading.
If you are working from a photo, hype up the contrast until the dark and light parts are clearly separated. If working from a model, try squinting to get the same effect.
Change your image to high contrast grey scale to better see the highlights and darks.
(You don’t have to include every spot of light or dark in your drawing; just the main ones will do. Remember you’re creating an impression not trying for an exact copy.)
The Building Blocks of Hair
Individual Hairs
You won’t be drawing many of these which is fortunate as there are some 100,000 of them on the average head. (We’ll come back to the individual hairs you do draw later).
Strands
Individual hairs clump together to form strands. There are wide and narrow strands but they are never all the same width.
The gaps between the strands are indicated by the lines you draw called texture or strand lines. Those strands that are further apart will have wide lines separating them; those close together thin lines.
If the lines indicating the gaps between the strands are darker in value the strands will look deeper. Lighter values indicate shallower strands.
Randomness is key to drawing realistic hair strands.
Locks
A variable number of strands will group together to form a lock of hair. The locks are the biggest building block of a head of hair.
Let’s recap the various components:
One hair is just that.
A variable number of hairs group together to form a strand.
Strands group together (loosely), to form locks.
Together all the locks make up the head of hair.
Each lock has its own mind and may flow between, above and below the others. This is easier to see in wavy hair; more challenging in short and very curly hair but they are there if you look for them.
Step 4 - Stacking the Blocks to Draw a Head of Hair
Begin with the largest building block, the lock. Start drawing at the parting (if there is one), or from the forehead where the hair grows out of the head.
The locks will follow the flow lines you have already drawn. (Draw some that don’t as well, just to achieve randomness and realism.)
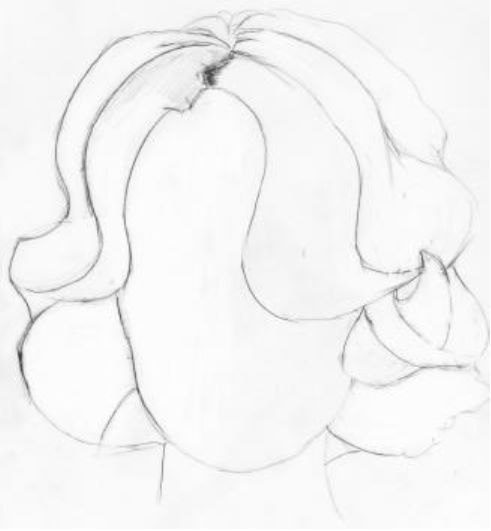
First draw the overall shape of the lock. Locks emerge from the head and then become narrower as they move down the head. (Or up, depending on the hairstyle). Locks tend to clump together at their loose end. Some people have very straight hair in which case the locks will hang more or less straight from where they grow out of the head with little narrowing at the ends.
Locks can lie on top of each other and intertwine. Observe your reference carefully.
Notice how straight hair is less likely to clump at the ends as opposed to curly hair.
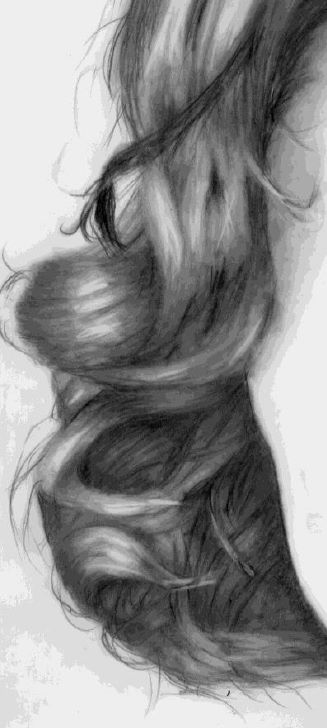
Shading the Locks
To draw a lock that looks 3-dimensional, shadows, mid-tones and highlights must be applied to it. Darker values will recede while lighter areas will advance. This effect is most easily seen in curly hair. Each twist and turn will be indicated by a change in value.
The easiest way to apply shading to a lock is to lay down an even layer of mid – tone over your drawing and blend till smooth.
Pull out the highlights in each lock with an eraser and deepen the darks with a soft pencil moving from dark towards light areas.
Blend lightly and repeat as many times as necessary until you are satisfied.
An eraser in the form of a pencil which can be sharpened works well to lift fine highlights; or you can mould a putty eraser to a fine point.
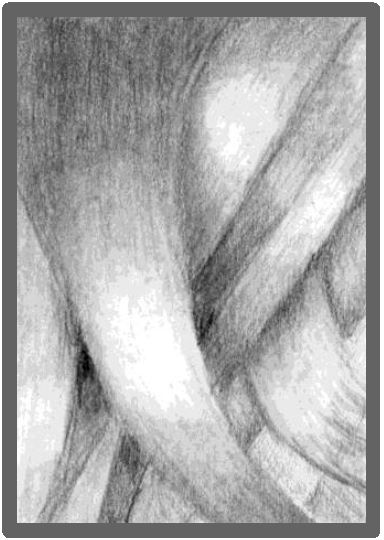
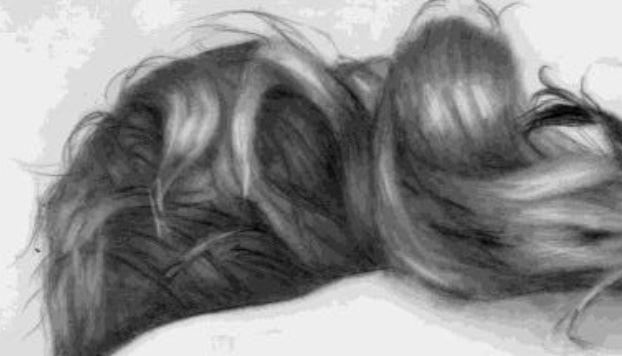
In the image above you can see stylised locks of overlapping hair. No strand texture has been added so you can better see the overlapping effect.
As one lock flows under another, a shadow is cast by the one on top. This shadow gives depth and realism to your drawing. Study each lock and how it interacts with other adjacent locks to decide how to apply values to show its unique form.
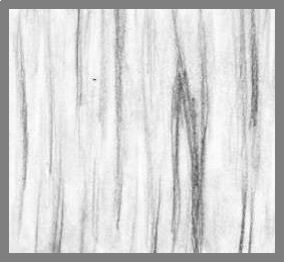
Step 5 – Adding Texture
Now the final step is to add texture to transform this Medusa-like cartoon into a realistic head of hair.
Drawing lines that separate the various strands of hair making up a lock will add the realism.
Once again, the parting is a good place to start but if there isn’t one then from the forehead. When you start drawing your strand or texture lines, don’t have them all start at the same spot on the forehead or parting.
Observe your reference or your own hair growth pattern and stagger where the hairs emerge to give a more natural appearance.

When you have drawn your texture lines; once again blend to soften and add further layers as you see fit by repeating the process.
Blending will cloud your highlights, but you can use the kneaded/putty eraser to brighten them again. Subsequent layers will add depth to the hair.
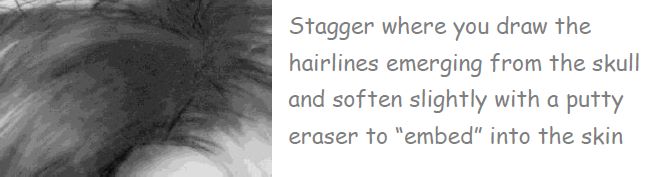
Use a kneaded eraser to soften the place where the hairs emerge from the skin to "embed" them and a more realistic impression.
Things to remember when drawing strand texture lines in hair
Don’t have your lines between the strands all the same distance apart, nor all the same width, nor exactly parallel – randomness is the key to realism. Use a blunt pencil for some, a sharp point for others; light pressure for some; heavy pressure for others.
The strands follow the overall flow of the lock they make up. Occasionally a strand will break away slightly and not follow the normal pattern so look out for this – that randomness again.
Be confident in drawing your lines! Don’t waver, just go for it. Remember as long as your strand lines are following the shape of the lock you can’t go wrong.
Keep your hand comfortable. Most of the drawing movement will be in the wrists and the fingers. Keep your forearm supported on the table and move from the wrist to draw your lines. Sometimes using an underhand pencil grip and resting your elbow against the paper as a fulcrum, will give you increased freedom of movement and make your task easier if your drawing is large.
It often helps to turn your paper when drawing hair instead of using your pencil at an awkward angle.
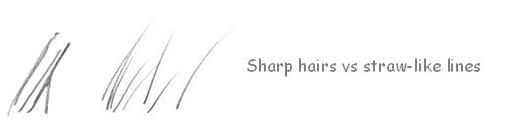
Start in the dark areas of a lock and let your stroke lighten towards the end of the stroke by easing back on the pressure which will taper the end and give the impression of strands of hair and not bits of straw.
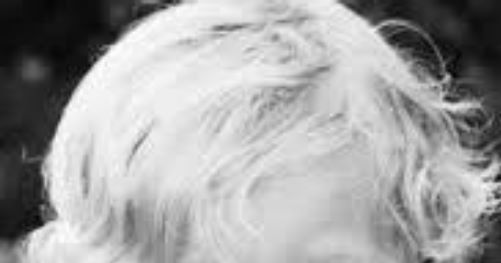
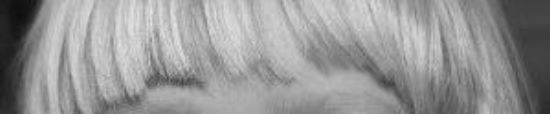
Don’t draw in too much texture. Less is more. Texture will be most visible in the light areas (usually) with the darks relatively texture free. Sometimes, when drawing very blond hair, like this baby’s, texture is seen in the darks with the lights containing very little texture.
When the lines move from the darks into the midtone areas, be sure to stagger the strokes that overlap the highlight– no unnatural straight lines here. Let some lines go right through the highlight.
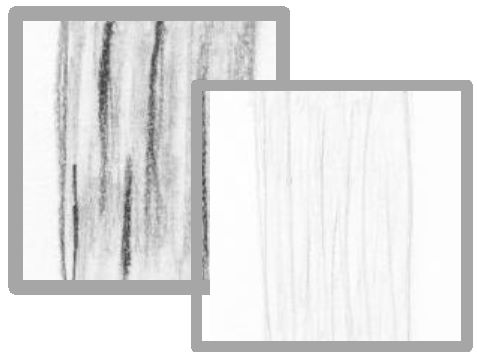
High contrast between the lines (i.e. dark, wide lines) used to draw in the texture in the light areas, suggests a coarsely textured hair.
When the texture lines are closer in value and narrower in width a softer texture emerges.
Remember the brighter the highlight the fewer strand texture lines will pass through it.
Even in the dark areas there will be strands that are lighter than others. You can use a kneaded/putty eraser to pull out areas of medium tone from your dark areas.
If your covering of dark graphite is quite thick, always use the kneaded eraser first to remove most of the graphite before using a rubber or you may drive the graphite deeper into the tooth of the paper instead of erasing it. Cut a fresh wedge off your rubber to ensure a fresh erasing edge whenever needed.
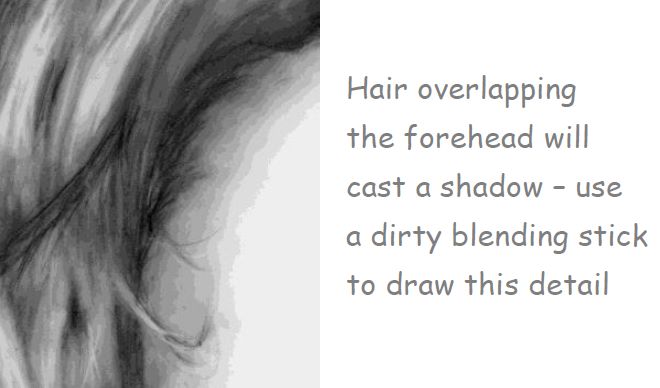
If the hair overhangs the forehead and/or cheeks, it will cast a shadow. How hard edged this shadow will be will depend on the light source – a diffuse light source with give soft shadows, a concentrated light source hard edged shadows.
Where the outline of the hair overlaps a lighter background, use a kneaded eraser to soften the contrast slightly. This will help to integrate your drawing with the background.
Individual Hairs
Although you could never draw every hair on the head -nor would you want to - there are certain individual hairs which are very important to draw to achieve realism. These are called the fly-away hairs.
Hair does its own thing, so it never has a totally smooth outline no matter how sleek the styling. There will always be individual hairs that rebel and move at different angles to the rest of the hair. This is especially visible where these hairs are silhouetted against the background but also occurs across the hair locks where individual hairs move against the flow of the hair.
How to Draw Fly-away Hairs
Method 1
Easiest is to use a mechanical pencil with a thin lead. Alternatively sharpen your pencil to a very fine point and draw in these wayward hairs which are usually individual or in small groups.
To make them even more real-looking, don’t make them the same value along their entire length. Draw the hairs with one sweep of your pencil but then go back in with the kneaded eraser to lighten parts of the hair shaft. This will give the effect of light playing on the hair and introduce movement.
Method 2
If you are one of those people who plan in advance, you can make provision for these fly-away hairs by indenting them into your paper surface before your begin your drawing. They will remain stark white and stand out against the tone of the rest of the head or background.
To indent, use any hard, sharply-pointed object like a darning needle, strong tooth pick or possibly the easiest - a ballpoint pen that has dried out. (Make sure its dry or you will ruin your drawing).
After you have lightly sketched the contours, directional lines, established where the individual locks are and you know where the light is hitting each lock, you can carefully draw lines with you dry pen that you want to remain white when your drawing is finished. Do this before you apply any shading to the paper. Press hard enough to indent the paper but not hard enough to tear it. If you are using a needle, make sure the head is smoothed with sandpaper before you begin.
Having indented the lines, you can put in your shading right over the indentations and they will remain white. When shading, use your pencil on its side or use a blunt pencil so it will skip over the indentations and not fill them in.
Blending between texture applications may darken these indents slightly as some of the loose graphite powder will be pushed into the grooves. It is possible to brighten them up again by pressing a kneaded or putty eraser into a very sharp point between two fingers and carefully running this along the indent.
If you want to introduce value into parts of these indentations use a very sharp led or a mechanical pencil in a really narrow width that will fit inside the indents.
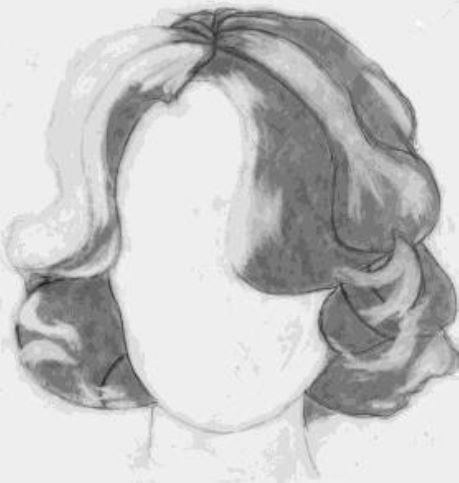
And that is all there is to drawing realistic hair. Here is my completed hair study: