
In this tutorial we will learn to draw the eye.
We will start off by constructing the outlines of the eye onto the paper, then proceed to shade it in until it looks realistic.
In the process I will show you the common mistakes that artists make when constructing their eye drawings.
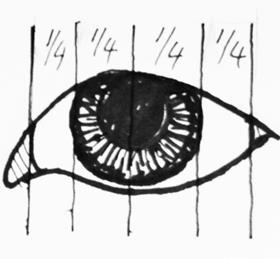
The Eye is Not an Oval
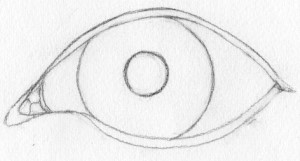
The default shape we are hardwired to use for eyes is an oval, with the widest part of the opening in the middle.
To make your drawing uber-realistic, draw the highest point of the top lid roughly 1/3 in from the inner corner of the eye and the widest point of the lower lid roughly 1/3 in from the outer corner.

A line joining the widest point would thus be at an angle.
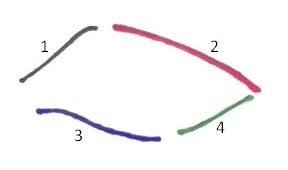
Drawing this shape involves drawing 4 lines that look like this – easy not so?
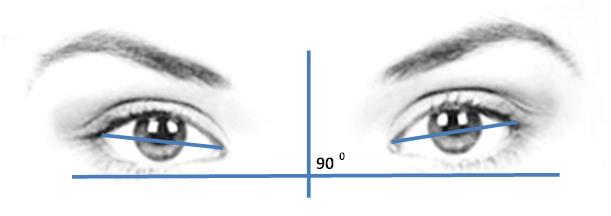
Look Out for the Slant
Not all eyes are the same – (think Cleopatra). Take a ruler and join the widest part (longwise) of the eye with a line. You can immediately see how the eyes are set compared to a line drawn under the eyelids and one drawn at right angles to the centreline of the face.

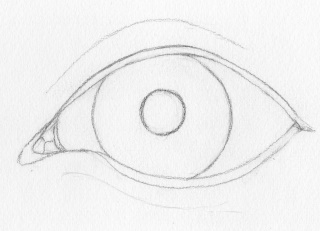
Now for Iris and Her Pupil
This legendary “window to the soul” or iris, which is the coloured part of the eye, and which contains the pupil, covers about 1/2 of the area that you see when looking at the eye.
If your subject is facing head-on, with their eyes not turned to one side or the other, the irises and pupils should be perfectly round and the same size as each other. If you have difficulty in drawing a perfect circle, (be consoled it’s supposed to be a sure sign of madness), you can cheat by getting yourself an inexpensive circle stencil which has many different size circles to choose from – there will be some that are just right).
If however, your subject is looking to the left or right; up or down, the iris and pupil will be elliptical not round – their shape will depend on the angle of the eyes.
We are hardwired to react to pupil size. A large pupil is experienced as welcoming and attractive so consider this when drawing your eye. You can use your artistic license to enlarge the pupil slightly from what you see on your subject. Don't however make the pupil too large that it looks unnatural.
Putting a Lid On It (Eyelids)
Make sure the upper lid covers the top of the iris (unless your subject is very surprised in which case there will be gap between the iris and the upper eyelid). The lower lid is usually very close to, or touching, the lower part of the iris but you need to check your reference very carefully.

Eyelids have thickness and are not just drawn as lines. Look for their thickness, which is especially visible on the lower eyelid and draw it in.
Top and bottom eyelids wrap around the eyeball and have thickness. For your drawing to look realistic, you should show this. The lower “shelf” of the eyelid is easily visible especially at the outer edge of the eye. Near the inner corner there is a slight bulge in the skin which often hides it from view.
The upper eyelid shelf is more difficult to see as the upper eyelid protrudes more and rounds over on itself. Eyelashes also tend to hide the shelf, especially in women, but look carefully at your reference to see if you can spot it.
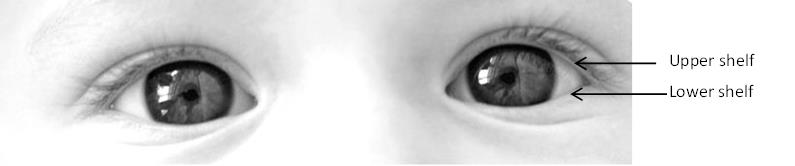
When drawing the shelf of the lower lid, use a very light pressure – even a broken line as you only want a suggestion of where it is - no hard lines. (More on this when we start shading the eye).
and now for the Pro Tip which prevents your portrait from looking pop-eyed…
After you have ticked all the boxes above…
Under the top eyelid, introduce a shadow which is wider than the iris and thickest at the centre of the iris and getting narrow towards the outer edges of the eyeball – sort of banana-shaped.
Blend the lower edge of the shadow ever so gently - just to soften so it merges with the eye below and voila! – the pop-eye problem is a thing of the past. The eyes now look as if they are set into the head, not bulging out with an artificial stare.
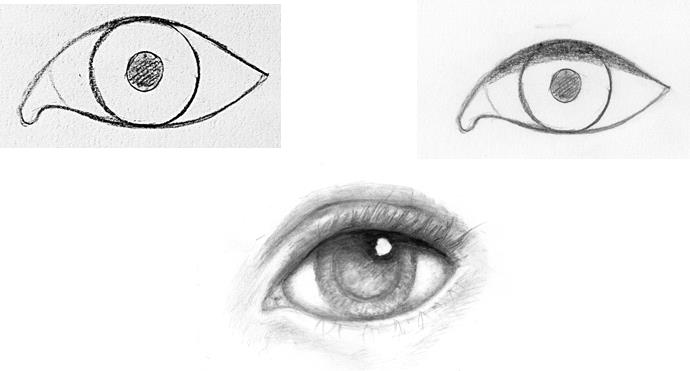
Sketch the Eyelids
With the basic shape of the eye established, sketch in the eyelid shelf where you see it.
Then take a look at the tear duct area. It usually has a highlight or two due to it's shape. Lightly mark where those highlights are.
At this point your eye will look something like this:
Sketch the Eye Creases

Lightly pencil in the position of the crease situated above the eye. It roughly follows the contour of the eye although there can be large individual differences - even in the same pair of eyes. The crease is also often hidden by folds of skin – especially in older people
There are also creases below the eye – very subtle but they become more obvious with age. Once again no hard lines – just a suggestion of where they are will do it.
Map the Highlights and Eyebrows
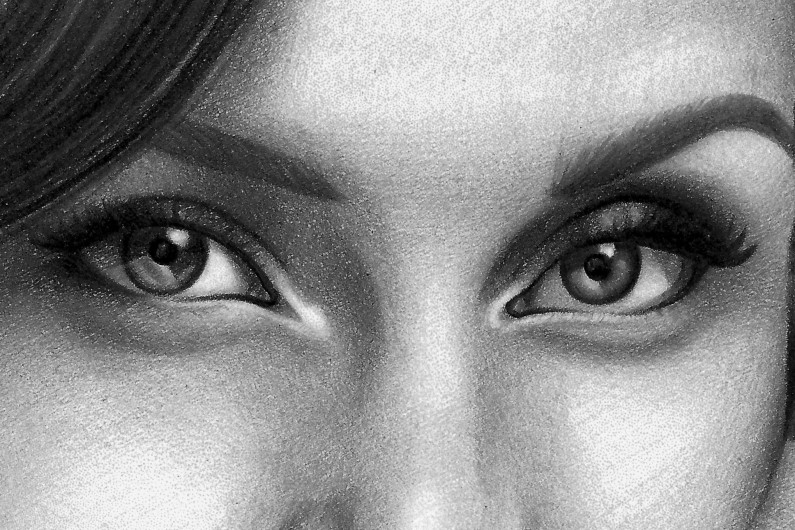
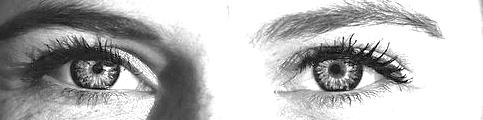
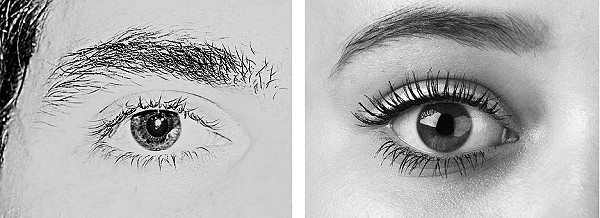
The eyebrows are like the face’s exclamation marks and give expression. In men, the eyebrows are usually closer to the eye than in women and bushier.
Eyebrows are thicker at their inner corner - close to the nose. This is especially so in men – women tend to cheat by plucking. The eyebrows reach a high point above the outer 1/3 of the eye then slope down to the outer corner of the eye.
Here you can see an example of the difference between male and female eyebrows:
Pencil in a rough outline for the eyebrow using very light pressure – dark construction lines will be impossible to remove later and will spoil your final drawing).
I usually sketch it in slightly smaller than it really is. (When you draw it tends to grow a bit and you don't want to give your model bushy eyebrows when they don't have them.)
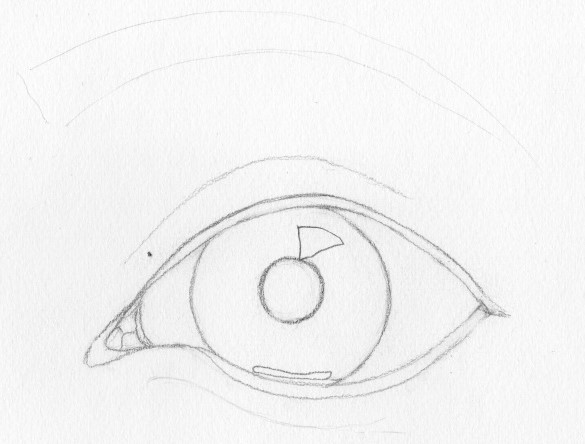
The final thing to be done before you start shading, is to outline the areas you are going to leave white in the iris and pupil so you don’t accidentally shade over them; i.e. the main highlight in the iris and a sliver just below the iris and above the lower eye shelf which will give the impression of the eye being moist and increase the realism of your drawing.
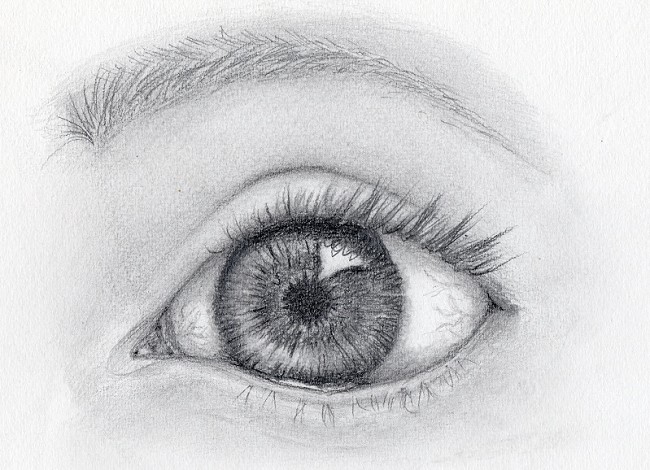
This is what the final sketch looks like before we start shading:
Shading the Eye
We will now take the outline of our eye and start shading it so that we end up with a beautiful realistic, 3 dimensional eye.
In order to do this first establish where the light is coming from.
After you have ticked all the boxes above…
Under the top eyelid, introduce a shadow which is wider than the iris and thickest at the centre of the iris and getting narrow towards the outer edges of the eyeball – sort of banana-shaped.
Blend the lower edge of the shadow ever so gently - just to soften so it merges with the eye below and voila! – the pop-eye problem is a thing of the past. The eyes now look as if they are set into the head, not bulging out with an artificial stare.
A cardinal rule (i.e. one that ALWAYS applies), is that the further you move from your light source the darker it gets. Sounds simple-stupid but it is this rule that will enable you to produce drawings with depth (i.e. three - dimensional instead of flat)
MATERIALS YOU’RE GOING TO NEED
1. Drawing paper. Preferably with a smooth grain as you will be drawing very fine detail. (For practice I usually just use photocopy paper.
2. Pencils – a 4H, 2H, HB, 2B and 4B will give you a wide value range.
3. A putty rubber of the kind used to fix posters to the wall - or you could buy a kneaded eraser from the art store.
4. A soft brush.
You are about to turn the two dimensional outline, or contour drawing, into a three dimensional image using the tools of the trade (different values) to trick the viewer's eye.
I order to do that we need to know what the different parts of the eye look like. Let's take a look at a side view diagram of the eye:
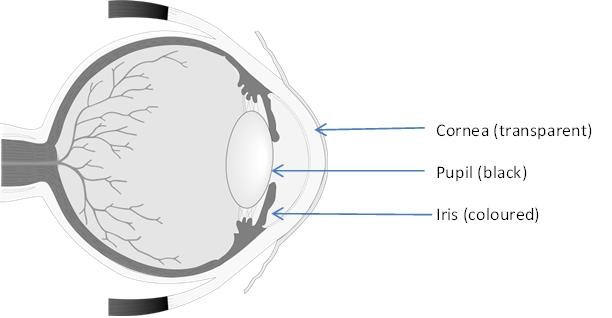
The cornea is the transparent layer covering the eye. Notice that it is convex. It is also moist. As a result it reflects an image of what is around it.
The pupil itself is nothing but a hole which lets in an amount of light into the eye so what we are actually seeing is the dark void inside the eyeball. For this reason the pupil is dark.
The iris is the coloured "muscle" that expands and contracts to let in more or less light into the eyeball. Notice that the iris is also slightly convex.
How to Shade with Pencil
Achieving different values in graphite is done by using harder and softer grades of pencil. The softer the pencil the lower the value; i.e. the darker will be the mark it makes. You can also use only a single mid-value pencil like a HB or a 2B using more or less pressure to achieve value changes but it’s more difficult to get a good result.
The rule is to first change to a hard or softer pencil to obtain the required tonal value. Only when that is not sufficient do you press harder or softer on the pencil.
To prevent your artwork from looking flat, you must have at least three tonal values - a highlight, mid tone and a shadow value. The correct use of these three values create the illusion that your drawing is popping off the page.
Shading the Pupil
Shade with a soft-grade pencil (e.g. 8B). Don’t press hard, build up layers gradually. You can (lightly), go over the 4B with a harder-grade lead, e.g. 2H, which will push the soft 4B lead into the tooth of the paper and eliminate white paper spots thus making it appear darker. Leave the outer edge of the pupil slightly uneven which increases realism.
Avoid an highlight areas that overlap the pupil.
Shading the Iris
Which grade of pencil (soft or hard), you use to shade the iris will depend on what colour you want it to represent. A dark brown eye needs a dark pencil grade, 2B or even 4B; whereas a very light blue eye could require a 2H. Green and hazel eyes will fall somewhere in between.
Shade the iris to show that it is convex. This means making it darker on the side that joins the pupil, lighter in the middle and darker again at the outer edge. Use a softer pencil grade, (e.g. 2B), for the darker areas and a harder pencil, (e.g. HB), for the lighter areas.
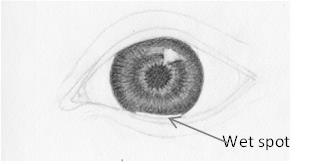
Don’t forget to leave the “wet spot” and the main highlight free of shading.
Use a soft mop brush to get rid of eraser crumbs or graphite dust from your drawing. The mop brush hairs are so soft that they flick the offending crumbs away without affecting the drawing underneath.
Adding Texture to the Iris & Pupil
Convey the texture of the iris with lines of varying length starting at the pupil edge and extending a short way into the iris. Draw similar lines starting at the outer edge of the iris coming inwards. Use a soft, but sharp, pencil (4B).
Using a blending stump, tortillion or cotton bud and very light pressure, blend over the iris starting from the dark pupil and working outwards to the adjacent lighter area and from the darker outer rim of the iris towards the lighter central portion. When you are done blending, be sure to use your putty eraser to pull out graphite that may have strayed onto the main highlight and wet spot.
Check carefully when drawing from a reference. Depending on the direction of the light, one eye may be more shaded than the other and therefore darker in value.
Shading the Iris
The iris is covered by the convex lens and transparent cornea. (ref. diagram above). You can’t see it but it’s there and it affects the way light falls on the iris underneath and thus on how we shade the iris.
Where the light first touches the cornea will depend on the angle the light is coming from. At that spot it will make the brightest highlight which will have sharp edges as the cornea is wet and smooth, i.e. very reflective.
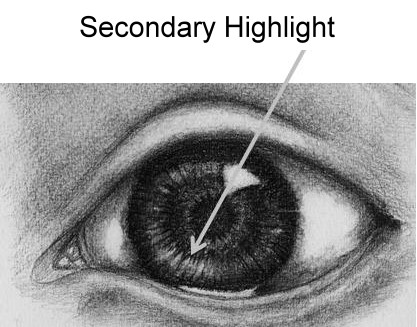
After entering the eye, the light continues to travel through the transparent cornea, at an angle and touches the convex iris lying underneath. This creates an area of lighter value on the iris on the side opposite the brightest highlight. I call this the secondary highlight.
You create this secondary highlight by moulding your putty eraser into a narrow point and gently picking out the graphite until you have achieved the degree of lightness you want. You will have to keep remoulding the point as it gets clogged with graphite.
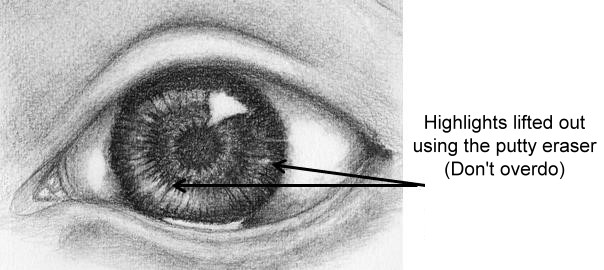
You can also shape this versatile tool into a blade shape to lift narrow strips of highlights out in the iris thereby adding even more depth and texture. If the highlights are too wide, simply make them narrower again using your pencil.
If there are no reflected highlights in the eyes, then you must use your artists license to add them in. It is these reflections that make the eye look alive.
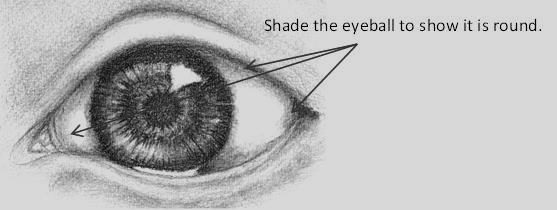
Shading the Eyeball
The top lid casts a shadow on the eye as explained earlier. To show that the eyeball is round, very lightly shade the corners and the bottom of the eyeball (above the lower eye shelf) to show that the eyeball curves away from the light.
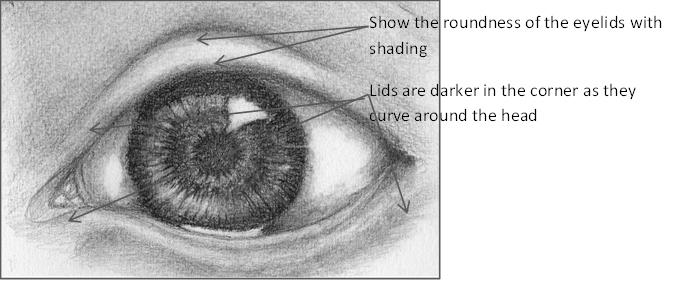
Shading the Eyelids
The lids are convex. You show this rounding with shading.
The lids also follow the shape of the head which is rounded, so they tend to be darker in the inner and outer corners.
Shading the Eye Creases
Be careful to avoid harsh lines in this area. The shadow which defines the crease doesn’t end suddenly but fades away gradually as it flattens out. As a result you make the crease dark in the centre and then gradually lighter towards the sides as shown below.
The shape of the crease above the eye also changes as the skin sags with age so observe your model carefully.
The darker the crease, the deeper it appears. You can use this to show more or less depth in the crease.
Shading the Inner Eye Area
The correct name for this area is the medial canthus and is where the tear duct is situated.
Don’t forget this area. It often has a bright highlight because of the moisture that collects here.
Use your marked highlights from the sketch stage to guide you with this series of short, sharp shadings. It is these shadings that make the tear duct area look wet.
I will often shade this area with a flat tonal value, then use my putty eraser shaped like a pin point to lift out these highlights.
Drawing the Eyebrows
Shade in the skin colour before drawing the eyebrows as it is near impossible to shade it in afterwards.
If you carefully observe the eyebrow you will notice that the hairs are not all pointing in one direction. They are constantly changing direction to conform to the curve of the face.
As a result we will need to use different strokes of the pencil in order to show these direction changes. Below I have sketched out these various strokes for you:
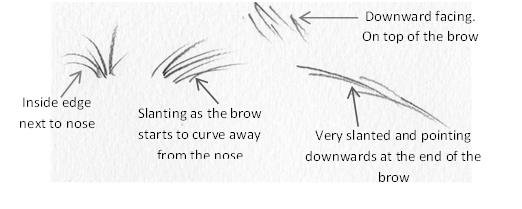
As you draw these individual hair, use a flicking motion starting from the root of the hair flicking towards the tip of the hair. This flick makes the stroke become thinner and lighter towards the tip of the hair. This gives the hair a more natural look.
Eyebrows sit on the brow ridge and wrap around the head, so will tend to be lighter in the middle and slightly darker at the edges.
As the hairs which grow in a downward direction on the top of the brow are usually lighter, draw them in harder grade pencil than the rest.
Using your putty eraser shaped like a blade, pull out thin highlights especially on the top side of the brows which catch the light. This will add texture and realism.
For the same reason don’t forget to add a few stray hairs here and there.

Always have a piece of paper under your hand where it rests on your drawing paper. This prevents smudging your drawing. For the same reason also don't drag this piece of paper over the drawing when you move it to a new location. Carefully lift it up from one end until it has completely lifted off your drawing paper, then move it to it's new location.
Drawing Eyelashes
Always draw your eyelashes after the rest of the eye has been completed as they overlap many parts of the eye and surrounding areas.
Lashes add tremendous eye appeal but are difficult to draw well. I have seen so many portrait drawings with unnatural eyelashes which have been drawn like this:
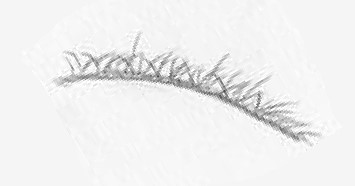
To draw eyelashes properly use these rules:
Eyelashes are curved. They curve down slightly from the upper eyelid and then up. On the lower eyelid they first curve up, then down.
Don’t draw too many eyelashes - it looks artificial. Here you can see an example of that:
They tend to occur in clumps with some single lashes in between.
Eyelashes you see head on will be pointing straight up and not to the side. They will also appear shorter due to foreshortening.
One way of drawing lashes is in two separate steps:
Step 1 draw a sparse and short layer of lashes at various angles and not all the same length.
Step 2 draw longer lashes in small bunches, also of varying lengths directly over the first layer.
Use a soft pencil when drawing eyelashes so that when you have drawn both sets of lashes, you can gently smudge to soften.
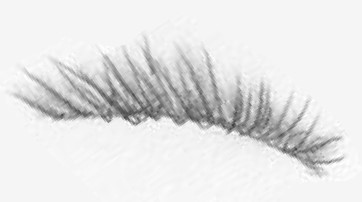
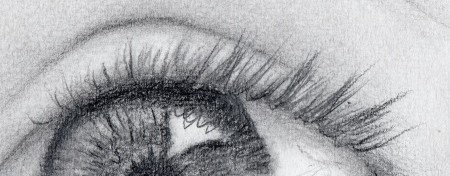
This is what natural looking upper eyelashes look like:
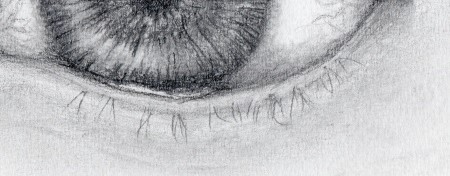
Eyelashes on the lower lid:
Are lighter, shorter and fewer.
Also tend to occur in clumps.
Lighten the bases where they grow out of the eye with a putty eraser to increase realism.
Sometimes the eyelashes are so sparse that instead of drawing them one by one, indicate their presence with a shaded area only.
Adding the Finishing Touches
To make your drawing really pop, increase the contrast by making the highlights lighter and the shadows deeper. Remember however to retain a range of values for your shadows and highlights or you will lose depth.
Darken around the edges of highlights to increase the contrast which makes the highlights look brighter.
If the highlight you have drawn in the iris is large enough, you can use a very sharp pencil to draw in the reflections of the upper lashes and using a hard pencil draw in some discrete blood vessels on the eyeball.
And you’re done!
Now all that remains is to sit back and admire your creation!